ASC — Record Vitals
Note
The following describes an opt-in feature for practices that have ambulatory surgery centers (ASCs). To enable this feature for your organization, contact your CSM. For more information, see ASC Setup: Enable ASC Features.
Before recording a patient's vitals, configure how vitals appear in the surgical case layout via the new Surgical Case Vitals & Measurements admin page.
You can record a patient's vitals in the Vitals and Measurements section of the Pre, Intra, and Post stages of the surgical case.
-
Claim Resolution/Clinicals: Access Healthcare Worker
-
Clinicals Admin
-
Clinicals Admin: Preconfiguration
-
Clinicals Admin: Vitals
-
Management - Clinicals
-
Superuser - Clinicals
With the Vitals and Measurements section, you can:
-
Toggle between the vitals recorded in the Pre, Intra, and Post stages
-
View new information in the Intra-op and Post-op Full Case Summary
To toggle between the vitals recorded in the Pre, Intra, and Post stages
No matter which stage of the surgical case you're in, you can toggle between the vitals recorded in the Pre, Intra, and Post stages (for example, if you're in the Post stage of the surgical case, you can still view the vitals recorded in the Pre or Intra stages. If you're in the Intra stage, you can view vitals recorded in Pre and Post, etc.).
Click PRE, INTRA, or POST from the menu on the left side of the Vitals and Measurements section.
Note how in the previous
Alternatively, you can click the header bar of another stage to view the vitals recorded for that stage.
athenaOne highlights the stage you're looking at via the blue header bar at the top of the Vitals and Measurements section.
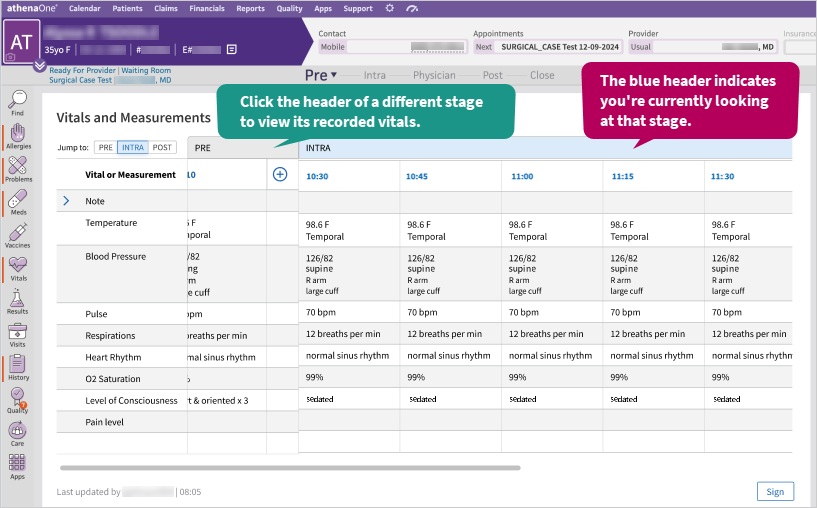
This change allows you to compare a patient's vitals recorded at different stages. This is especially helpful in the Post stage, where you can monitor when a patient's vitals return (or come close) to the baseline vitals recorded in the Pre stage.
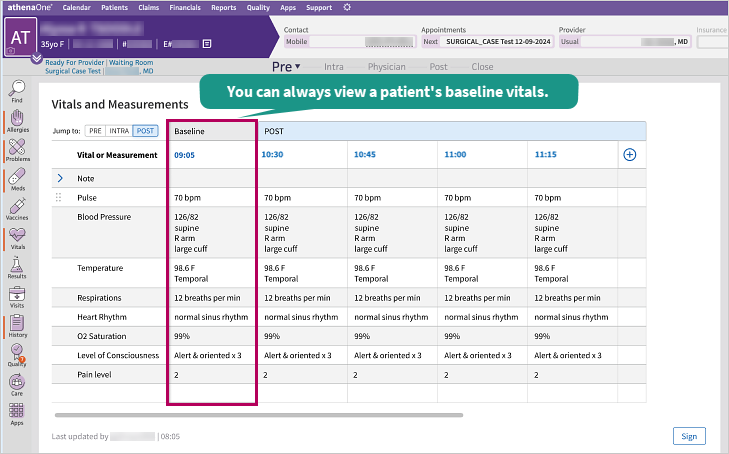
To reference a patient's baseline vitals
The baseline vitals (the patient's vitals when they were first assessed) remain sticky across the Vitals and Measurements section for you to reference as you scroll horizontally across their vitals. That way, you can always reference their baseline vitals no matter which stage you're viewing.
To add a patient's vitals
You can add a new set of vitals to any of the stages by clicking the add icon ![]() within its section, even if you've already completed the stage.
within its section, even if you've already completed the stage.
-
In the Vitals and Measurements section of the Pre, Intra, or Post stage, click the add icon
 in the stage you want to add vitals for.
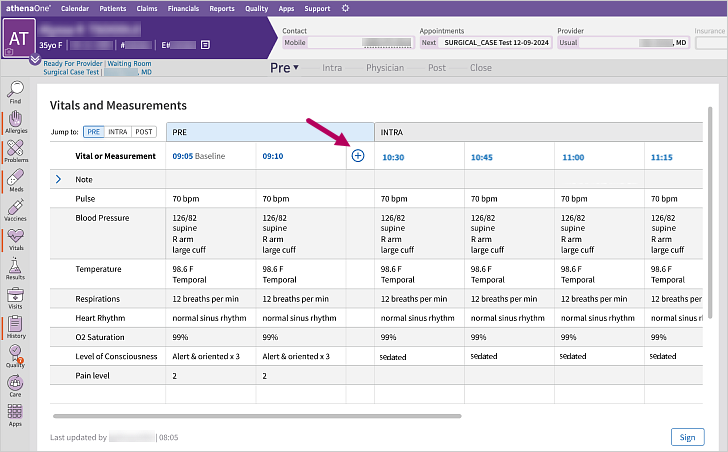
- Click the calendar icon
 to select today's date and click the clock icon
  to select the current time.
Tip: Click into the time field and enter "N" on your keyboard to automatically input the current time.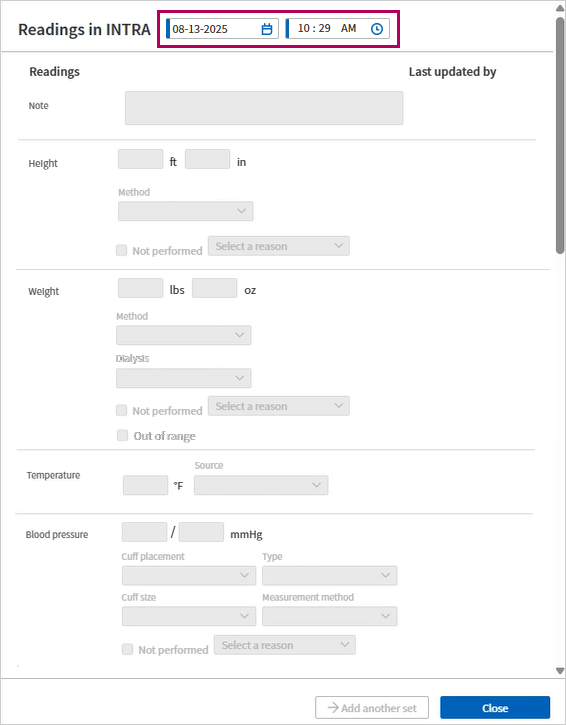
Note: You must complete this step in order to unlock the rest of the fields. -
Record the vitals based on your customization:
-
Note
-
Height
-
Weight
-
Temperature
-
Blood Pressure
-
Respirations
-
Pulse
-
Pulse Quality
-
EKG Rhythm
-
02 Saturation
-
ETC02
-
MAP
-
Blood Glucose
-
Pain Level
-
LOC
-
Aldrete
-
Bleeding
-
SC/CC
-
Dressing
-
Grip
-
Inhaled 02 Concentration
-
Edema
-
Pupils
-
Push Pull Feet
-
Push Pull Hands
-
Site Check
-
Skin Color
-
Skin Temperature
-
Tongue
-
VOD (Oculus Dexter)
-
VOS (Oculus Sinister)
-
VOU (Oculus Uterque)
-
Intakes
-
Outputs
-
-
Click Save & Close.
Note
-
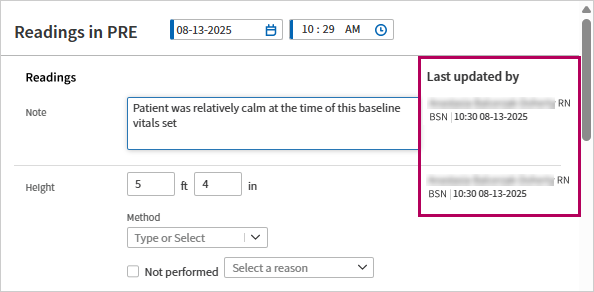
When you complete each step, your username and time stamp appears to the right under Last updated by.
-
If you want to add another set of vitals, click Add another set at the bottom of the window.

-
You can double-click any empty cell to add a new vital directly.
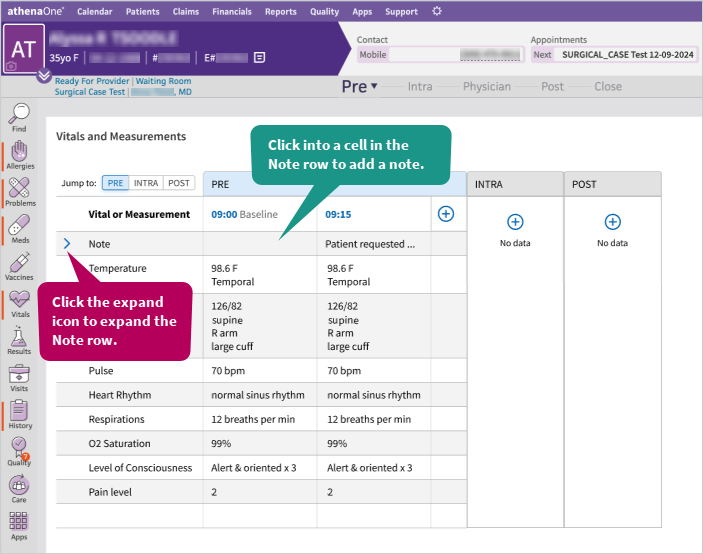
To add a note to a patient's vitals
Click into a cell in the Note row in any stage and enter up to 3,000 characters. To expand a cell to view the whole note, click the expand icon  next to Note.